Graphic Design Tips for New Adobe Creative Suite Users
Adobe fundamentals – such as the mighty pen tool and shape builder – will give you a solid design baseline. But you will never learn everything you need from the fundamentals to create beautiful design.
So here’s a list of cool and helpful tools in the Adobe Suite that I wish I had known about and experimented with when I first started designing. Check out these tools and other graphic design tips to take your design skills to the next level.
Content-Aware Scale (Shortcut, Option + Shift + Command + C)
Content-Aware Scale is a lifesaver. Often you’ll find a great image you want to incorporate into your designs with a background, but the way the subject is framed in the photo just doesn’t quite work with the way you’re cropping it. Being able to slightly extend a background or other elements in the frame with a natural look is a great time saver and allows you to use images that you may have otherwise rejected due to the image’s original composition.
With this tool, less is more. Overly stretching your image will distort it to an unusable level. One trick I use is copying the layer (CMD + J) with only the “background” information so that it’s less likely to manipulate the pixels. This, combined with the clone stamp tool, can bring a lot of creative freedom into your projects.

Perspective Warp + Smart Objects
After designing the perfect layout, giving it the best display possible really sells it. The Perspective Warp tool converts your flat design into a fantastic mockup. Mockups are great, but knowing how to use Smart Objects and develop your own is a super powerful tool to help clients see your designs in context.
I often use the Smart Objects tool to show off custom layouts on trade show booths, something that doesn’t have an easily available mockup like a phone or desktop computer screen. To make mockups look more natural, don’t forget to blend in the flat graphic with a gradient map on top to add lighting to the scene.
Using Smart Objects in Photoshop in combination with Perspective Warp lets you work much faster. Smart Objects do a lot, but in the case of mockups you can use them like Indesign’s link feature – meaning that you can plug your new graphics in and they will automatically apply to the original mockup.

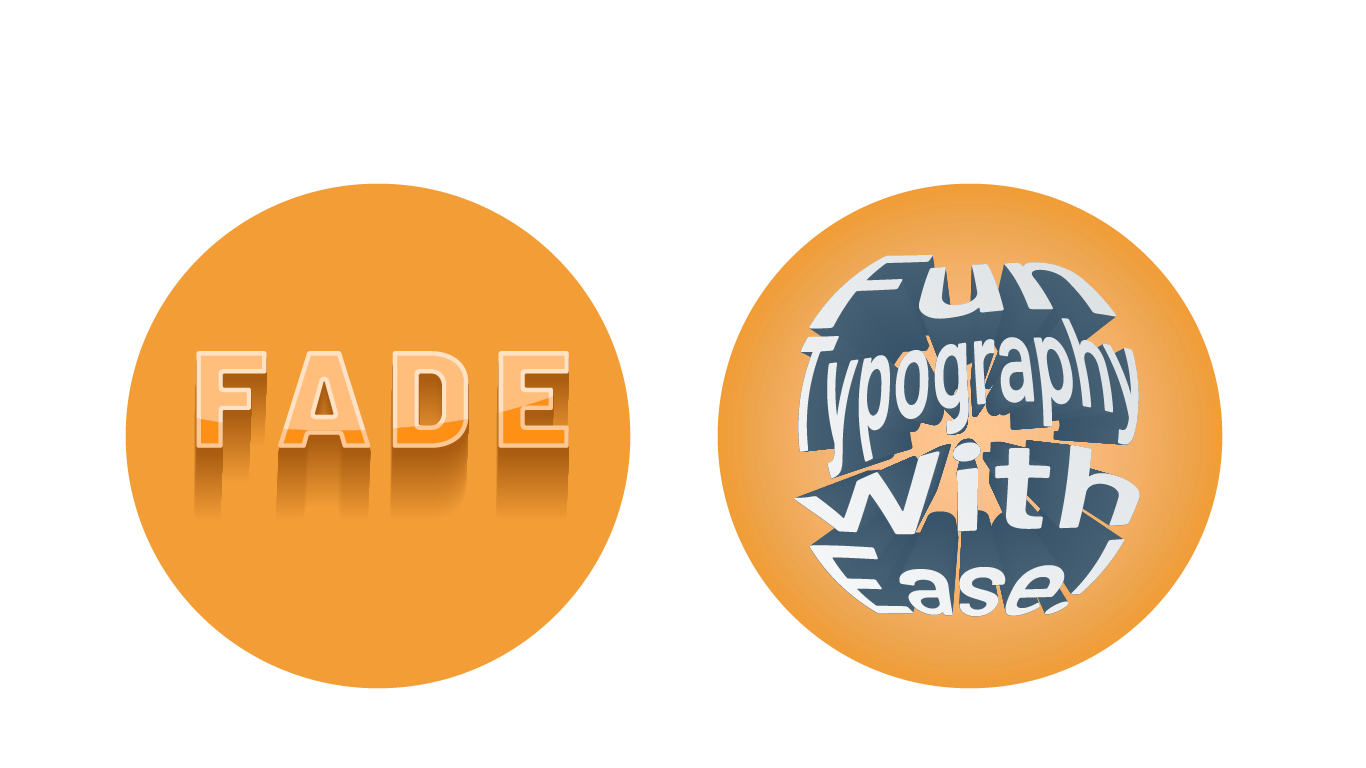
Envelope Distort
One of the ways to create interesting typography on the fly is using the Envelope Distort feature. By filling many types of shapes with typography you can create a variety of different types of effects without needing to modify single points on outlined text.
This can create striking typography that can be displayed front and center on your designs, an approach that works well for fun projects like posters, stickers and campaign advertisements.
Replace Spine + Blend Tool
(Shortcut, W)
The Blend tool alone is very powerful when you want to create three dimensional graphics with color gradients.
Blend lets you create many different types of patterns and shapes, but you wouldn’t know that by just using the blend tool itself. “Replace Spine”, a feature within the blend tool, allows you to change the path between points A and B, creating a much more complex shape.
Combining the Blend tool with Envelope Distort can create very interesting effects!
Transform > Scale Strokes + Effects
This feature is a very small, easy-to-miss checkbox found on the Transform panel. For a while, I wasn’t aware of this “Transform” tool and found it difficult to manipulate stroke width when creating icons. But with this checkmark ticked, you can scale graphics and the stroke width will go along with your transformation instead of having to fiddle with both the size of the object and the stroke separately.
Indesign Data Merge
Data Merge is one of the most powerful, yet hidden, tools within Indesign. There is a surprising amount of utility in this feature as it allows you to populate fields of your choosing with an Excel sheet. You will save a lot of time populating a single document or exporting many at once.
Some common ways to use this tool are creating business cards, filling in charts (such as agendas or invoices), and mailing information.
This is an older feature of Indesign that has a few quirks to it and it can be tricky to start using if you’re unfamiliar with how it works. The best practice when starting a data merge is to create an entirely new Microsoft Excel sheet and save it as .csv comma delimited. Once you define your parameters inside both the Excel sheet and Indesign, there are a few different settings depending on if you want to populate many different pages or export the same type of data across the same layout.
One of the problems when starting out as a graphic designer is not being aware of the tools that are out there - Adobe has much to offer if you dig around. The best way to get better is to practice and explore!
I hope these tips step up your interest in finding Adobe's lesser known tools, and find your favorite trick. If you need some of these tricks applied to your brand, Start a project with us!

James Hays
Associate Designer, DC&Co
Resources
All Posts


We're a design studio founded on passion, focus, and service.
Address
264 South River Road
STE 502
Bedford, NH 03110
Project Inquiries
Employee Portal


